Showing posts with label Hair tutorials. Show all posts

Softly Pinned Half Updo Tutorial

Saturday, November 1, 2014


Curls are pinned softly, with little definition, giving the hair a nice shape that still flows as if it were all down.

How To Style:
  • Step 1 : Start by curling your hair with a 1 ½ inch curling iron, adding spray wax for more texture.
  • Step 2 : Use your fingers to softly scrunch up and pin sections of hair, pinning around your ear level.
  • Step 3 : Insert the bobby pins up into the hair, pushing the hair up slightly as you pin to add more body.
Source : SOFTLY PINNED HALF UPDO

Tutorials You Should also see :

Asymmetrical Twist Hair Tutorial


Steps :
Step 1 : Using your rat tail comb, section off a portion of hair at the crown of your head.
Step 2 : Holding your hair with one hand, take your teasing brush and gently tease the sectioned off portion of hair.
Step 3 : Release your teased hair and — with your brush — gently blend it back with the rest, making sure not to flatten the body you’ve created. Now, gather it into a low side-ponytail.
Step 4 : Start twisting your hair away from you.
Step 5 : Twist your hair into a bun, tucking the ends under when you finish.
Step 6 : Grab those bobby pins and start pinning everything in place.
Source : In the Thick of It: 3 Fancy Hairstyles for Thick Hair

Tutorials You Should also see :

Rocker Chic Hairstyle Tutorial


How to Style :
Step 1 : Wash your locks with a volumising shampoo and conditioner and apply a volumising styling mousse like Whipped Creme by Sebastian to create texture and body.
Step 2 : Tip your head upside down and rough dry your hair to give greater root lift.
Step 3 : Next, using a round bristle brush, blow-dry your fringe bringing it heavily to the front with lots of tension.
Step 4 : Then take random sections of the hair and wrap them around large heated curling tongs - hold each section for 30 seconds and then remove. Concentrate the curling from the mid-lengths down, avoiding the root area and parting and the last two inches for a more natural, organic feel.
Step 5 : Once done, run your fingers through your locks to separate and shake the curls and give a less structured look.
Step 6 : Use a High Hair Punk Chic by Wella for defining and enhancing texture - tip your head upside down, apply the product into your hands and rub into your hair to maximize movement.
Step 7 : Lastly, spritz with hairspray to give the fringe hold, whilst giving the rest of your look some control and definition.

Tutorials You Should also see :

How To Style an Knotted Up-Do

Monday, October 20, 2014


Here is an easy, fast updo, great for any holiday parties you mighty be going to.

Source : How to Do an Easy Knot Up-Do

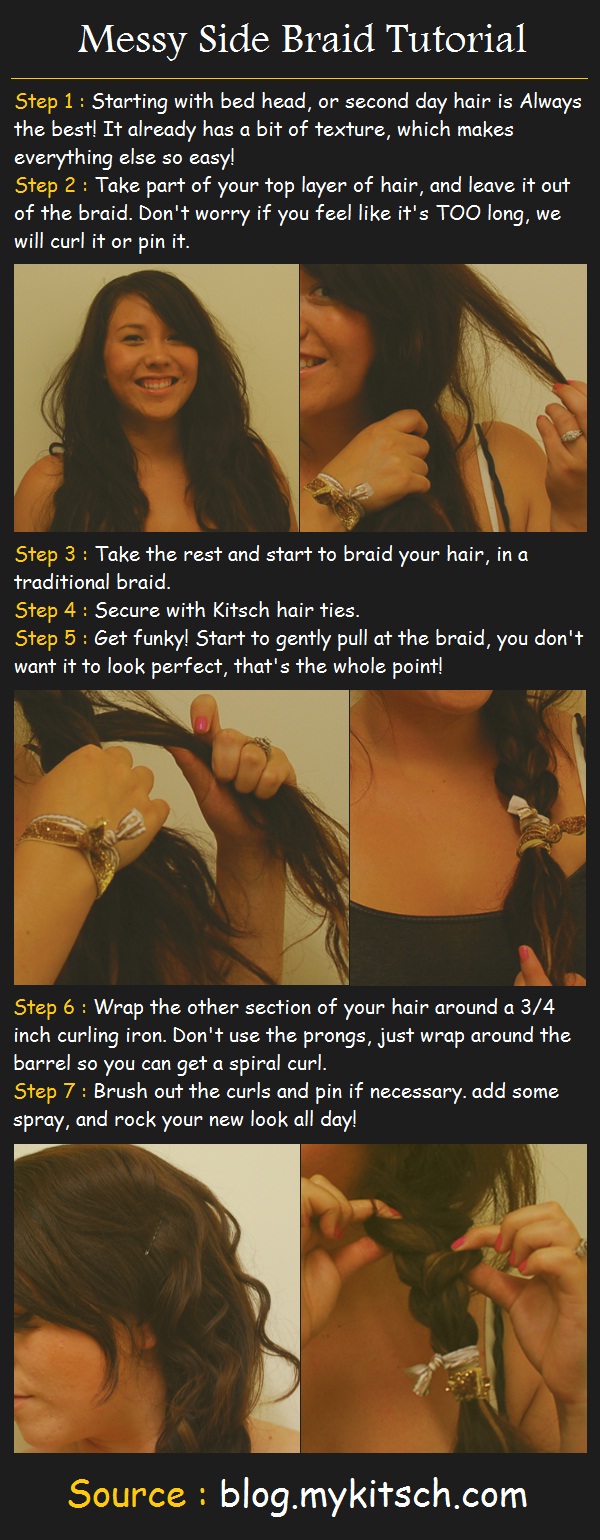
Messy Side Braid


How To Style :
  • Step 1 : Starting with bed head, or second day hair is ALWAYS the best! It already has a bit of texture, which makes everything else so easy!
  • Step 2 : Take part of your top layer of hair, and leave it out of the braid. Don't worry if you feel like it's TOO long, we will curl it or pin it.
  • Step 3 : Take the rest and start to braid your hair, in a traditional braid.
  • Step 4 : Secure with Kitsch hair ties.
  • Step 5 : Get funky! Start to gently pull at the braid, you don't want it to look perfect, that's the whole point!
  • Step 6 : Wrap the other section of your hair around a 3/4 inch curling iron. Don't use the prongs, just wrap around the barrel so you can get a spiral curl.
  • Step 7 : Brush out the curls and pin if necessary. add some spray, and rock your new look all day!
Source : How to: Messy Side Braid

a chic and elegant chignon


How To Style :
  • Step 1 : you will need a can of hair spray, comb, different sizes of bobby pins & and a hair band.
  • Step 2 : curl the ends of the hair.
  • Step 3 : lightly tease crown of head and set with hair spray.
  • Step 4 : brush over the teased hair with a flat brush.
  • Step 5 : make sure the top of your hair is smooth and set with hair spray again.
  • Step 6 : tie your hair into a low pony tail & add some volume by lightly pulling the hair up with the end of brush.
  • Step 7 : re-tie the hair again, but this time don't pull your hair entirely through the band.
  • Step 8 : cover the hair band with the remaining hair and use bobby pins to secure the chignon.
  • Step 9 : set with hair spray & be very generous with it!

Source : DIY- chic chigons

Romantic Cascade Braid

Saturday, June 28, 2014


How To :
- Make a dramatic side part on the far left side.
- Beginning at the side part, French braid along the front of the hairline, moving towards the right ear.
- Continue to braid, weaving in more and more hair as your work towards your right ear. Stop braiding just behind the right ear and secure with a dark or clear elastic.
- Take the remaining loose hair and curl 1-2" sections with a large barrel curling iron or a flat iron.* Gently run your fingers through curls to separate.
- To finish the look, wrap curls around bottom of braid to cover the elastic.
- Add a light mist of hairspray. And your done!

    Source : Hair dos: How to create a romantic cascade braided headband with curls

    Styling a Hair Bow Tutorial

    How To :
    - Brush your pretty locks.
    - Make half a pony tail by using a small hair tie.
    - take your pony tail halfway trough the hair tie, to create a 'loop'.
    - Split the loop in half.
    - Grab the leftover piece of hair, and fold it over the middle.
    - Secure with a bobby pin.
    - Make sure that you can't see the bobby pin.
    - Take one of the 'loops' and spread it over the side of your head. Slide a bobby pin through the middle of the loop. Repeat this on the other side.

      Source : Hair Bow DIY

      Quick & Easy Updo Hair Tutorial


      steps :
      Step 1 : Divide hair into three sections, the majority of your hair ending up in the low ponytail at the back of your head.
      Step 2 : Loosely braid the ponytail and secure it at the bottom.
      Step 3 : Tuck the bottom of the braid under the elastic securing the top of the braid, then pin the loop that forms to your head.
      Step 4 : Use the extra hair on the left and right sides of your head to wrap around the braid. You can twist them as much or as little as you like. Secure with more bobby pins.


      Source : Quick And Easy Updo Tutorial

      A Milkmaid Braid

      Saturday, May 24, 2014

      How To Style :
      • Step 1 : Part your hair down the middle, from the front of your hair line to nape of your neck.
      • Step 2 : Braid symmetrical braids, one on each side, and secure the ends with an elastic band. Clear bands are easier to hide within the style.
      • Step 3 : Take one of the braids and pull it up and over to the opposite side of your head. Secure the end of the braid with bobby pins. You can hide the pins by placing them within the braid. Repeat with the opposite side, Secure with bobby pins. then Spray with a light finishing spray.
      Source : How To Do A Milkmaid Braid

      Chignon With a Headband

      Wednesday, May 21, 2014


      How To :
      - First you need an elastic headband.
      - Curl the ends using a medium curling iron.
      - Apply a small amount of product at the ends.
      - Put the headband two inches behind the hairline and pin it to secure.
      - Take small sections and twist them back+up.
      - Tuck them into the headband and secure with a pin if necessary.
      - Finish the back and use a hand mirror to check your balance.
      - Finish the entire hairstyle by spraying generously with hair spray.

        Source : Short Hair Chignon With a Headband


        Followers

        Popular Posts